Overall I am pleased with how my animation had turned out. I have found this module very difficult and knew at the beginning it was not going to be my strong point. I initially chose this fable because I did not have to model a lot of characters as I wanted to keep it simple. However, I did struggle at the beginning to get started and what I did model I decided to start again with. Looking back at the project I feel that I could have done a lot more independent research to get a better understanding of 3D Max Software.
My strengths of this project have been updating my blog as every time I completed something I wanted to blog it so I know what I have done. My weakness has been not spending enough time of the project itself. Towards the end I found it a rush to get finished and even though I have an animation I do not think it is to a great standard. If I was to do the project again I would be more familiar with the software and how to create certain parts such as the skinning of the biped. I do feel more confident in using the software and felt that I have learnt a lot from this module.
Wednesday 5 May 2010
Premiere Pro
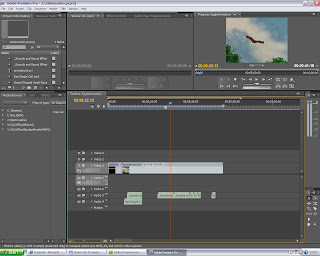
Once my frames had rendered I imported the animation into Adobe Premiere Pro. In here I created a title to play at the beginning of the animation with my Sid Details on. I also added some sounds effects I had gathered of an eagle screeching and wings flapping to give the animation a more realistic feel.
Tuesday 4 May 2010
Rendering
Once I was happy with the finished animation it was time to render the scene. I changed the width to 800 and the height to 600.
I also had to ensure that the render was saved as Microsoft Video 1 as the compression type, this was to enable that when I was in Pemiere Pro it will be able to play the file.
I rendered the first version but the video seemed to show the pixels in the frame and it did not seem smooth. I changed this by rendering it again and adjusting it to the best quality.
Sound Effects
I decided that I wanted to use some sound playing over the video to add to its look and feel. Using the internet I had a look for some eagle calls and also wings flapping. Some were not very good, but I managed to find a good website that allowed me to download the clips for free which is always a bonus! So my next job once the scene has finished rendering is to import the file into Adobe Premier Pro and have a play around with the sounds.
Monday 3 May 2010
Lighting the Scene
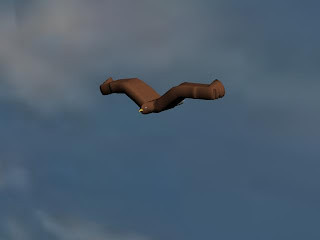
I have placed a target light into the scene. I have placed the light spot in front of the scene on the eagle and have pulled the camera up so the light is coming from the same direction of the user. The light makes the clouds look realistic and highlights the model well.

I have also changed the material on the bottom plane, to give it a texture. I used a smoke in the material editor and added to different colours green and brown. Lastly I played around with the until I was happy with it.

Sunday 2 May 2010
Camera Angels
Once I was happy with the animation it was time for me to add a target camera and change its angles. i decided to select a target camera from the panel and implemented it onto the scene. This took some time to set it up because I wanted to experiment with the different views. Like animating I clicked on the auto key on the timeline, and positioned the camera at different angles. I have used close ups, mid shots, low angle shots to show the eagle and the scene in the most appealing way.

I did have one problem at this stage because I created an animation and was pleased with how it looked, however I somehow saved over the finished version!
I was very annoyed because I then had to go back and do it all again. I cant quite understand how I done this because I was saving my work as different files all the way through but that will teach me to not do it again!!


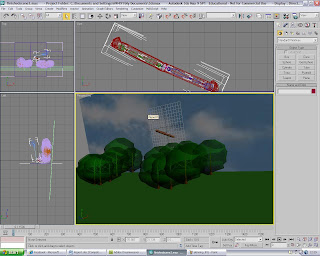
Merging the Models
After carrying out some research I was ready to begin the modelling again. Setting key frames and moving the timeline along I was able to animate the model. I found this part quite tricky but soon got the hang over it. The final animation shows the wings flapping, the eagle being struck and falling to the ground. To import the arrow I had to merge it into the scene, and tick the box at the bottom. I also imported the scene I had created. The scene was tricky to place because it seems I have made things difficult for myself by using different views. However, the animation matches the storyboard so I am quite pleased with this.


Saturday 1 May 2010
Research into Eagle flying
I had created a simple animation by adjusting the wings and setting key frames. However when I played the animation back it did not look very realistic as the wings appeared too bent and floaty. The movement was also consistant throughout with no gliding. I decided to carry out some research on how an eagle glides and moves through the sky using video clips on http://www.youtube.com/. This proved to be very helpful and I was ready to try the animating again.
Below are a videos I looked at:
Below are a videos I looked at:
Friday 30 April 2010
Animating
Once I was satisfied with the skinning I had to start on the eagles animation. I animated the wings by moving them to an approproiate position and set a key frame for each one. Once I was happy with the motion I added more scenes in the timeline by holding down the shift button I copied what I had orginally made and moved them along.

As you can see in the timeline below I have copied the keyframes.


As you can see in the timeline below I have copied the keyframes.

Thursday 29 April 2010
Skinning the eagle
After applying the biped to the eagle the next stage was skinning the eagle. I done this by adding a skin in modifier pannel. Under the parameters category I turned on edit envelopes and turned on vertices, this allowed to me to select the vertices in the eagle. I started by skinning the right wing first so I had to had the bipeds arm. I set simple key frames to see how the eagle flapped its wing to see how it moved and if it pinched in any parts. The wing did not flap with out some distortion to its body so I had to select certain vertices and applied a weight. In order for the vertices to be taken into affect I had to bake them. I had to complete this until the arm flapped smoothly. The skinning proved quite tricky and was very time consuming as I wanted it to look realistic when animated.
I then had to apply the same to the right wing. I am pleased with the overall look of the skinning however I think the left wing looks better than the right one and this is apparent when the wings beat together.
I decided to to add a beak and some eyes to the eagle to make it look more realistic. I done this by appling a sphere and cloning into and for the beak I used a cone. I also applied a material to the eagle so the tail is so it matches the one of the arrow and the body is brown.
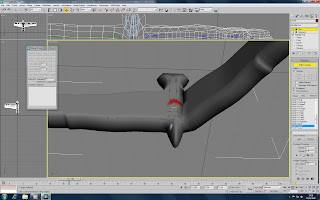


Wednesday 28 April 2010
Creating a Scene
I decided that the scene would consist of a blue cloudy skyline and trees and greeny on the ground. To begin I researched tutorials on http://www.youtube.com/ to help come up with some ideas as I feel that modeling is not my strong point.
To begin I had to create a plane and in the modifers list turn on the noise, I then raised up the strength and added more segments to the plane so the the ground was not completely flat. I then applied a grass material to the plane and changed the tilling by 2.5 which made it visually more appealing. To create a sky I drew a sphere over the entire plane. Using the hempisphere button I cut the sphere in half. In the modifier list i chose normal, which allowed me to view the sphere on the inside. I then applies a UVW MAP and seleceted spherical. I then changed the amount of segements to 60 to give it a rounder shape. In the material library I chose a gradiance of three different shades of blue and applied it to the sphere. I was happy witht this sphere but found it confusing when I wanted to place the foliage inside because I had to make sure I was inside the sphere.

Looking at other peoples scenes I had noticed that instead of using a sphere they had used a plane and as a backdrop. I decided to keep the plane on the floor and place a plane on the back. I applied a material to the backdrop, this time I used an image of the sky from the internet. I lastly applied some foliage to the scene to make it more realistic.

Tuesday 27 April 2010
Modelling the Arrow
The final object I had to model was an arrow. I used basic shapes such as a sphere for the point, a cylinder for the long body and planes that I attached to the side. By scaling and resizing the parts I was able to play around with the until I was happy. I then grouped the three objects so they did not move when I moved the arrow.I then applied material to the object to make it appear more realistic. I used three different materials, wood grain for the body, metal for the sphere and feather on the end planes. The arrow is now ready to be merged into the scene with the eagle and animated.
I am pleased with the overall look of the arrow and think it looks very ralistic.


I am pleased with the overall look of the arrow and think it looks very ralistic.


Monday 26 April 2010
Applying the Biped
After modelling the eagle I then placed a biped into model and had to start skinning. The biped was simple to place into the eagle and I only had to adjust a few limbs such as pull out the arms as they were to act as the wings so make them flap. I also pulled the head up so the eagle could move but I was unsure if i was going to animate this part yet.

The image shows the arms strecthed out and the last thing I had to do was adjust the head to fit into the eagles.

The image shows the arms strecthed out and the last thing I had to do was adjust the head to fit into the eagles.
Wednesday 31 March 2010
The Eagle: take 2
So after my first attempt failed misserably I decided to approach the modelling in a different way. Richard told the class of a wesbite called www.turbosquid.com andI decided to have a look on their for some eagle images. I was really impressed with some of the eagles on their and this gave me a boost of confidence because I thought this is not going to to be impossible to do.
I started by finding an image I liked and one I thought would be easy enough to map. I saved the image and in 3D Max created a plane and in the material editor I attached a reference image so i had a guide to use when modelling. Next I created a box and in the object properties I converted it to see through so I was able to see the image in the background. This was very important because after all this is what I needed to look at whilst modelling. The next thing was to convert the it to an editable poly which would allow me to shape the box.


As you can see from the image the box has been coverted see through and there are a number of vertices on the box ready for me to begin modelling.
 The image above shows I have modelled half of the eagle.


I started by finding an image I liked and one I thought would be easy enough to map. I saved the image and in 3D Max created a plane and in the material editor I attached a reference image so i had a guide to use when modelling. Next I created a box and in the object properties I converted it to see through so I was able to see the image in the background. This was very important because after all this is what I needed to look at whilst modelling. The next thing was to convert the it to an editable poly which would allow me to shape the box.

I needed to add more vertices to the object because I had to pull these in to create the shape. Using the edge selection I clicked on one side of the box then in the selction category I clicked on ring and then in the edit edges category I seleceted connect. I repeated this a number of times so i had enough vertices to build the shape. After this I then selected each vertice to draw out the shape of the eagle.
As you can see from the image the box has been coverted see through and there are a number of vertices on the box ready for me to begin modelling.
I deciced that I would only model one side of the eagle and then I would apply the symmetry modifyer to create the other side so it would be even and saving my time by not having to model both sides.
 The image above shows I have modelled half of the eagle.
I then turned on the turbo smooth modifier to get a better feel for the model.

Modelling the Eagle
One thing that I have learnt about 3D Max is it is a very time consuming piece of software and you can spend ages trying to perfect a model. I think this was one of my problems as I spent ages trying to perfect the eagle by editing the vertices and the edge too much. This proved a big problem for me because as I was moving some of the body about the other parts started to look distorted. I tried to fix this problem but it got so bad that I decided I had made too much of a mess to be able to save the image. Rather than starting again I decided to use a different approach to achieve my model which some of my class mates had used and this was to attach an image onto a plane and model this way. I was disapointed having to start again because at one stage my eagle was starting to take great shape and I felt I was actually getting somewhere but I will just look at it as a learning experience as it has helped me become more experieced with the 3D Max software.

The eagle image in 3D Max before I started again as you can see a basic shape is starting to form.
Sunday 14 March 2010
Modelling the Eagle: take 1
To begin modelling i created a box shape in 3D Max, and started to extrude the middle bits to shape it into an eagle, creating some wings and elongating the body. I used an image from the web to refer to its shape and from there I converted the shape into an editable poly and selecting the edge tool I shaped the bird. This method took some time as I had to keep refering back to the eagle image to make it look realistic. As you can see from the image below I have the basic frame of an eagle and need to carry on tweeking it to look more realistic.

Thursday 11 March 2010
Waves and sunset tutorial
I have attempted some of the tutorials that are on Richards Blog to familiarise myself with Max and learn animation techniques. I do find that I work my way through and then get stuck at some point but I suppose its all part of the learning process!!
Thursday 4 March 2010
Cartoon Eagles
I have started to search the Internet to find a cartoon image of an eagle that I will use to model. The eagle will have to have a bright coloured feathered tail because this will be used in the arrow.
Thursday 18 February 2010
Storyboard: The Eagle and the Arrow


I have created the storyboard below highlighting the different frames in the fable.
Frame 1: An Eagle was soaring through the air.
Frame 2: Suddenly it heard the whizz of an arrow.
Frame 3: The arrow came soaring towards the eagle.
Frame 4: The eagle found itself wounded to death with blood pouring out of it.
Frame 5: Slowly it plumits to the ground.
Frame 6: Looking down upon the arrow with which it had been pierced, it found that the shaft of the arrow had been feathered with one of its own plumes.
Ball Animation: Basic key frames
In todays tutorial we learnt how to create a basic animation of ball rolling around on a plane. Using create key frames automatically and manually and also positioning, scaling and rotation as well as introducing basic animation tools.
Wednesday 3 February 2010
Initial Idea 3: The Wind and The Sun
The Wind and the Sun were disputing which was the stronger. Suddenly they saw a traveller coming down the road, and the Sun said: "I see a way to decide our dispute. Whichever of us can cause that traveller to take off his cloak shall be regarded as the stronger. You begin." So the Sun retired behind a cloud, and the Wind began to blow as hard as it could upon the traveller. But the harder he blew the more closely did the traveller wrap his cloak round him, till at last the Wind had to give up in despair. Then the Sun came out and shone in all his glory upon the traveller, who soon found it too hot to walk with his cloak on.
"Kindness effects more than severity."
"Kindness effects more than severity."

I have chosen this fable as it reminded me of being a child in primary school. I like the idea of the sun and wind competing against each other. The fable has three main characters which would not be too difficult to create. However I am unsure of how i would create the wind and would possible have to include more objects such as trees and leaves to show the scene is windy.
Initial Idea 2: The Eagle and The Arrow
An Eagle was soaring through the air when suddenly it heard the whizz of an Arrow, and felt itself wounded to death. Slowly it fluttered down to the earth, with its life-blood pouring out of it. Looking down upon the Arrow with which it had been pierced, it found that the shaft of the Arrow had been feathered with one of its own plumes. "Alas!" it cried, as it died,
"We often give our enemies the means for our own destruction."
"We often give our enemies the means for our own destruction."

I have chosen this fable as a second idea because I think I would be able to achieve the arrow and the eagle successfully. The fable only has two main things to include so I think I would be able to model them without too much difficulty. I would also have to design the eagle to look cartoon like as achieving a realistic bird with its feathers would be quite hard.
Initial Idea 1: The Two Fellows and The Bear
Two Fellows were travelling together through a wood, when a Bear rushed out upon them. One of the travellers happened to be in front, and he seized hold of the branch of a tree, and hid himself among the leaves. The other, seeing no help for it, threw himself flat down upon the ground, with his face in the dust. The Bear, coming up to him, put his muzzle close to his ear, and sniffed and sniffed. But at last with a growl he shook his head and slouched off, for bears will not touch dead meat. Then the fellow in the tree came down to his comrade, and, laughing, said "What was it that Master Bruin whispered to you?"
"He told me," said the other,
"Never trust a friend who deserts you at a pinch."
"He told me," said the other,
"Never trust a friend who deserts you at a pinch."

I like this fable because of the image it creates in your head, the fable can also be linked to everyday life because you have to know who to trust. The animation would use both a human and an animal, which shows a good contrast. I think however a bear would be difficult to animate as it is fury and capturing this to look realistic would be difficult to achieve.
Friday 29 January 2010
Reaction to the brief
My initial reaction to the brief was this is going to be a lot of hard work! We were shown some vidoes to help us come up with some ideas of how we can animate our fables, this was useful as it gave us an indication of what we need to achieve by the end of the module. As my skills in building the content is not my strong point, which I found from my experiecne of last years semeter, I may have more luck with the animation side. I will now start to research Aesops fables and gather ideas for my animation.
Subscribe to:
Posts (Atom)