Overall I am pleased with how my animation had turned out. I have found this module very difficult and knew at the beginning it was not going to be my strong point. I initially chose this fable because I did not have to model a lot of characters as I wanted to keep it simple. However, I did struggle at the beginning to get started and what I did model I decided to start again with. Looking back at the project I feel that I could have done a lot more independent research to get a better understanding of 3D Max Software.
My strengths of this project have been updating my blog as every time I completed something I wanted to blog it so I know what I have done. My weakness has been not spending enough time of the project itself. Towards the end I found it a rush to get finished and even though I have an animation I do not think it is to a great standard. If I was to do the project again I would be more familiar with the software and how to create certain parts such as the skinning of the biped. I do feel more confident in using the software and felt that I have learnt a lot from this module.
Wednesday 5 May 2010
Premiere Pro
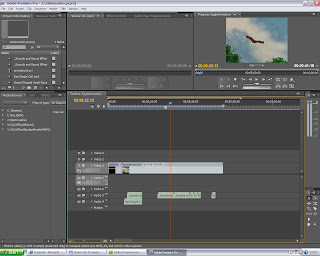
Once my frames had rendered I imported the animation into Adobe Premiere Pro. In here I created a title to play at the beginning of the animation with my Sid Details on. I also added some sounds effects I had gathered of an eagle screeching and wings flapping to give the animation a more realistic feel.
Tuesday 4 May 2010
Rendering
Once I was happy with the finished animation it was time to render the scene. I changed the width to 800 and the height to 600.
I also had to ensure that the render was saved as Microsoft Video 1 as the compression type, this was to enable that when I was in Pemiere Pro it will be able to play the file.
I rendered the first version but the video seemed to show the pixels in the frame and it did not seem smooth. I changed this by rendering it again and adjusting it to the best quality.
Sound Effects
I decided that I wanted to use some sound playing over the video to add to its look and feel. Using the internet I had a look for some eagle calls and also wings flapping. Some were not very good, but I managed to find a good website that allowed me to download the clips for free which is always a bonus! So my next job once the scene has finished rendering is to import the file into Adobe Premier Pro and have a play around with the sounds.
Monday 3 May 2010
Lighting the Scene
I have placed a target light into the scene. I have placed the light spot in front of the scene on the eagle and have pulled the camera up so the light is coming from the same direction of the user. The light makes the clouds look realistic and highlights the model well.

I have also changed the material on the bottom plane, to give it a texture. I used a smoke in the material editor and added to different colours green and brown. Lastly I played around with the until I was happy with it.

Sunday 2 May 2010
Camera Angels
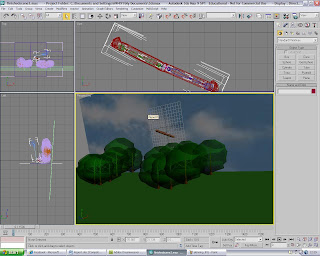
Once I was happy with the animation it was time for me to add a target camera and change its angles. i decided to select a target camera from the panel and implemented it onto the scene. This took some time to set it up because I wanted to experiment with the different views. Like animating I clicked on the auto key on the timeline, and positioned the camera at different angles. I have used close ups, mid shots, low angle shots to show the eagle and the scene in the most appealing way.

I did have one problem at this stage because I created an animation and was pleased with how it looked, however I somehow saved over the finished version!
I was very annoyed because I then had to go back and do it all again. I cant quite understand how I done this because I was saving my work as different files all the way through but that will teach me to not do it again!!


Merging the Models
After carrying out some research I was ready to begin the modelling again. Setting key frames and moving the timeline along I was able to animate the model. I found this part quite tricky but soon got the hang over it. The final animation shows the wings flapping, the eagle being struck and falling to the ground. To import the arrow I had to merge it into the scene, and tick the box at the bottom. I also imported the scene I had created. The scene was tricky to place because it seems I have made things difficult for myself by using different views. However, the animation matches the storyboard so I am quite pleased with this.


Subscribe to:
Posts (Atom)